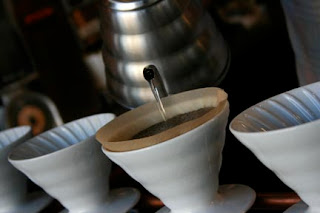
This crush quickly turned into a love affair. With it's accessibility, ease of use, and low price point, the pour-over drip method is by far my favorite way to enjoy the best micro-roasted coffee at work and home. These drippers can be set directly on a cup or you can get creative and build a drip station. I built the station at World Cup's 18th and Glisan location for about $60.00 in parts and a rainy weekend in my garage. There are many options for the beginning coffee connoisseur ranging from around $3.00 for a plastic Melitta dripper and getting a little bit pricier (around $20.00) for a porcelain model from either Hario or Beehouse. I personally recommend going for a ceramic dripper. There is always a possibility they could crash to the tile floor of your kitchen and cause a mess...but with a little care, they will last forever, look great in your kitchen, never give an off-taste to your brew, and retain heat a lot better during the brew process.
Step 1: Acquire a nifty little dripper and appropriate paper filters.
Step 2: The Brew
When using a pour-over dripper, an important thing to remember is that with such a simple method of coffee extraction, every attention to detail you can put into the process will pay off in taste. The most important factor is freshness!! (Think Slick Rick type of fresh.) Coffee is perishable: The fresher the coffee, the better the taste. For a 12 ounce cup of coffee, I am using 23 grams of coffee. If you don't have a gram scale at home, this is a little more than a 1/4 cup of whole beans. However, if you decide to get more serious about your morning cup of joe, I'd recommend picking up a basic digital gram scale for around $25. *Don't grind your coffee yet* For optimum freshness, only grind your coffee immediately before extraction.

The next step is to prepare your dripper by either placing it on your cup or drip station. Insert a filter and pour through a little hot water to "wash" the filter and preheat the dripper. There are different theories on whether it is important to wash the filter or not, but in my opinion it ensures that there won't be any off taste from the paper. When everything is hot and ready.... grind away.

*A note on grinders*
There are a lot of grinder options out there for home use. This is the point where you decide if you want to enter into the world of being a coffee geek or not. With that said, there are more and more options for people who want to get serious about coffee at home but don't want to break the bank. Hario makes a few models of hand-operated burr grinders that are very affordable and very well made. With a burr grinder you are able to get an accurate and consistent grind size. With a blade grinder, you will end up with an uneven grind resulting in an uneven extraction. The grind consistency should resemble a course beach sand (or an artisanal salt...for the fooodies out there).
Once your coffee is ground, place it evenly in the filter and pour a little bit of hot water (around 195 degrees Farenheit) over the grinds to pre-soak and bloom the coffee. MAKE SURE YOUR CUP IS UNDER THE DRIPPER BEFORE YOU POUR. This sounds obvious but it is important for the overall taste of your cup that you don't let this part of the extraction run down the sink. The bloom acts as a way to prep the coffee for the full extraction. The grinds start to open up, releasing carbon dioxide making the coffee rise and "bloom". Allow the coffee to bloom for 20-30 seconds.


When trying to master a pour technique it is helpful to have a kettle with a directed spout such as the Buono kettle from Hario. The long spout will allow you to have a more directed stream of water and more control in the speed of the flow. This element of control is where the Zen element of pour-over drip brewing really comes into play. Like a game of GO or Backgammmon, it is easy to learn but takes a lifetime to master. The pour is the personal element that allows you to control the level of turbulence in the brew process. Here at World Cup Roasters, we are using the Hario V-60 drippers that have directional ribs in the cone shape and a single large hole in the bottom. While pouring, we make small concentric circles in the middle of the grinds in the direction of these ribs. A moderately slow but steady pour ensures a nice even extraction and helps the dripper do it's thing with the ribs. In my experiments with other drippers, I've found that following the shape of the dripper with the pour allows gravity to work best and results in a great cup of coffee. Despite varying techniques, the one consistent element is a slow but steady pour in the center of the dripper. As well, you can stop pouring when you see your cup fill to about half way. In total, the brew process should take about 2 minutes.

Now put on your favorite vinyl, do the crossword, and enjoy your tasty brew.
Also, swing by our 18th and Glisan cafe and try our craft roasted coffee in a pour-over from one of our coffee pros.
Love,
Ryan Donaldson
Your friendly neighborhood barista trainer

Great photo's and very helpfull! Well done and thank you!
ReplyDelete